As the saying goes, "Home is where your story begins", we are writing quite the story. This is where we chronicle everything that has to do with Home Improvement, DIY or gardenting
Garages are the sacred places where we enjoy anything related to garage/automotive culture and the cars that live within. Look and see what is going on behind our overhead doors.
Workshops are spaces where ideas become reality. From woodworking to metal fabrication and everything in between. Visit often to find out the latest project on the bench.
Nothing happens in the home, garage or workshop without the proper gear. Find out what we use around the house to get things done. From tools to cameras, its all in here. Huepar ZK04CG Laser Level Unboxing and In-Depth first look. "Huepar ZK04CG Laser Level Unboxing and First Look"
Join us as we unbox the ZK04CG laser level from Huepar and walk through the setup process. We will also share our first impressions and initial thoughts on this new tool.
I have used and liked several other Huepar laser products in the past. I was excited to get to take a look at this newest product offering from their "Huepar Pro" series.
Product link (affiliate):
https://amzn.to/3VS9D7n
SUBSCRIBE FOR MORE VIDEOS: http://bit.ly/2qCFZkT
-----Social-----
http://instagram.com/busydadsworkshop
http://facebook.com/busydadsworkshop
The below affiliate links allow me to earn a small commission to help keep this channel going:
Shop Home Depot: homedepot.sjv.io/LQbz3
Busy few months! It has been non stop here at the Gables through late winter and this spring. The pavilion has been built. I have been working on power and water for the pavilion and the barn at the same time. I have also been working on a dedicated art studio for my daughters! #norestdays
I should really take a break at some point.
Trying to harvest black walnuts #short We have a massive black walnut tree on our property that we normally just pitch the walnuts. Thought I might try my hand at husking and cleaning a few of them to see how the turn out.
Click here for Rainwater Collection plans: www.busydadsworkshop.com/rainwater
Huepar DT03CG laser level kit - Overview and Use on a few projects The Huepar DT03CG green laser level. http://shrsl.com/34u3v This is a cost effective, fully featured level that any homeowner or contractor would be happy with for the price. The high priced options at the big box stores may limit the average DIY enthusiast or small business owner from picking one up. This option might be right for you!
In this video, I go over all the features of this kit along with my favorite accessory that you should absolutely purchase along with the laser level kit. If you have any question, please let me know in the comments.
⏰⏰ Timeline ⏰⏰
0:00 Indroduction
0:27 DT03CG Kit Contents
0:57 DT03CG laser level physical features
1:58 DT03CG laser level controls
3:09 Laser receiver
3:39 DT03CG compact tripod
4:25 12 foot tripod accessory
5:46 Overhead light placement with vertical crosshair
6:05 Drop Ceiling installation with laser level
6:24 Is the DT03CG worth the money
Product link:
Huepar DT03GC Laser Level: http://shrsl.com/34u3v
Huepar 12 foot tripod: https://shrsl.com/34u3w
Shop Home Depot: homedepot.sjv.io/LQbz3
SUBSCRIBE FOR MORE VIDEOS: http://bit.ly/2qCFZkT
-----Social-----
http://tiktock.com/busydadsworkshop
http://instagram.com/busydadsworkshop
http://facebook.com/busydadsworkshop
http://pinterest.com/busydadsworkshop
First test of rain water collection with IBC totes #shorts A short test of our rainwater collection system before finishing it.
Click here for system plans: www.busydadsworkshop.com/rainwater
Drip Irrigation for fruit trees - Step by step instructions Drip irrigation saves you time and water! Coming into the summer months we decided to start our mini-orchard and plant 4, Red Delicious apple trees in our side yard. The problem is that we would need to water both the trees and our new garden every day. To get more targeted and reliable watering, I installed a drip irrigation system for the trees so we don't have to worry about them even if we go away for any length of time.
⏰⏰ Time Stamps ⏰⏰
00:00 Introduction
00:28 Components of a drip irrigation system
01:58 Uncoiling the piping
03:25 Pipe routing
04:05 Installing regulator and filter assembly
04:39 Adding main feed line
06:10 Staking feed line in the lawn
07:28 Adding tree rings and main line taps
09:18 Terminating main line
10:04 Testing the system
10:22 Wrap-up
This video is NOT sponsored. Some of the affiliate links below allow me to earn a small commission to help keep this channel going:
Shop Home Depot: https://homedepot.sjv.io/LQbz3
Materials
Drip Irrigation Kit: https://aff.dripdepot.com/aff/idevaffiliate.php?id=330
B-Hyve bluetooth hose valve: https://amzn.to/3qqpQiv
Tools:
My favorite utility knife: https://homedepot.sjv.io/kDnJ3
Camera Gear:
Camera: Canon M50 https://amzn.to/3gUiX4O
SUBSCRIBE FOR MORE VIDEOS: http://bit.ly/2qCFZkT
-----Social-----
http://instagram.com/busydadsworkshop
http://facebook.com/busydadsworkshop
http://pinterest.com/busydadsworkshop
#dripirrigation #dripdepot
How to make cheap and easy garden trellis tunnels One of the best ways to add more growing space to your garden is to go vertical. It also gives climbing plants a place to go. We decided to build 'tunnels' out of these hog panels for a more dramatic effect.
⏰⏰Timeline⏰⏰
0:00 Introduction
0:56 Sizing of the cattle/hog panels
1:32 Placement of T-post supports
1:49 My way of driving T-posts
2:19 Broken welds
2:56 Setting cattle/hog panel in place
3:12 Zip-ties!
3:51 More trellises
4:08 3 complete trellises
4:25 Different sizes of cattle panels
4:45 Plant preview
5:17 Wrap-up
Below are links to some of the products and tools I used during this project and some of my favorite tools.
(Some of these are affiliate links that I earn a small commission from that help support the channel)
Shop at Home Depot to support my channel: homedepot.sjv.io/LQbz3
Shop at Amazon to support my channel: https://www.amazon.com/shop/busydadsworkshop
Materials:
Cattle/Hog Panel: https://bit.ly/3hbT3eE
7' T-post: https://bit.ly/3beqR73
8" Zip-ties: https://homedepot.sjv.io/gbOej0
Solar trellis lights: https://amzn.to/3uA19BE
Favorite Tools:
- Milwaukee M12 installation driver: https://homedepot.sjv.io/AoPkWo
- Ryobi Drill / Impact Driver kit: https://homedepot.sjv.io/VyyJ23
- Jobman work pants: https://amzn.to/3dmBXXR
Camera Gear:
Canon M50 Mkii: https://amzn.to/2PRgX3E
GoPro Hero 9 Black: https://amzn.to/3emhZht
SUBSCRIBE FOR MORE VIDEOS: http://bit.ly/2qCFZkT
-----Social-----
http://instagram.com/busydadsworkshop
http://facebook.com/busydadsworkshop
http://pinterest.com/busydadsworkshop
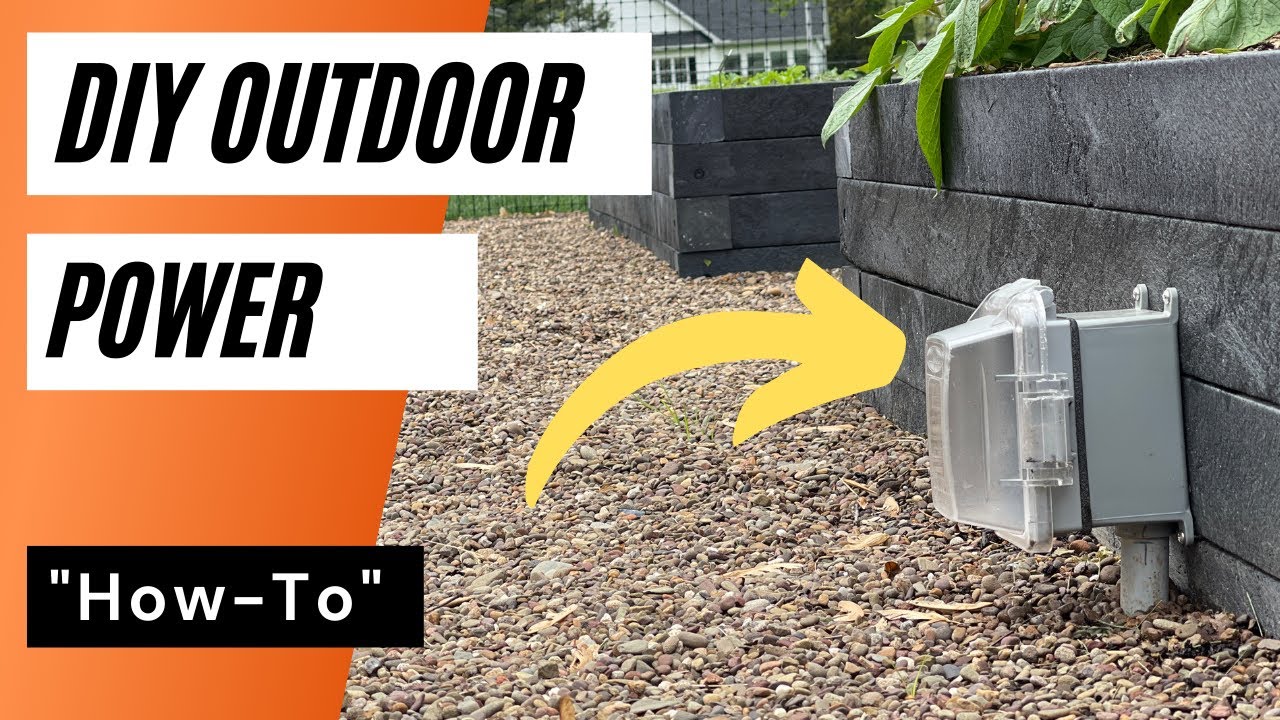
DIY Outdoor Outlet - How to install an outlet in your garden or yard ** Update: After examining my breaker box, I do already have a GFCI breaker in place. This means the extra cost of the GFCI outlet is not required.
Our garden is not just a place to grow food. It is also a place to sit and enjoy the surroundings. Adding power to the garden not only allows us to obviously use corded tools, it also allows us to add a small water feature in the future. This video goes over the steps I took to install a GFCI outlet in the garden and get it connected to an existing service outlet beside our HVAC compressor.
***DISCLAIMER***
DO NOT ATTEMPT ELECTRICAL WIRING IF YOU ARE NOT FAMILIAR WITH ELECTRICITY, TOOLS OR LOCAL CODES!
************
Below are links to some of the products and tools I used during this project and some of my favorites.
(Some of these are affiliate links that I earn a small commission from that help support the channel)
Shop at Home Depot to support my channel: homedepot.sjv.io/LQbz3
- 3/4" Conduit: https://homedepot.sjv.io/EaEGaK
- Single Gang Outlet Box: https://homedepot.sjv.io/rnaen3
- Weather tight cover: https://homedepot.sjv.io/jWeDWP
- Milwaukee M12 installation driver: https://homedepot.sjv.io/AoPkWo
- 14/2 wire https://homedepot.sjv.io/Xxmoyg
- Ryobi Drill / Impact Driver kit: https://homedepot.sjv.io/VyyJ23
- Jobman work pants: https://amzn.to/3dmBXXR
Camera Gear:
Canon M50 Mkii: https://amzn.to/2PRgX3E
GoPro Hero 9 Black: https://amzn.to/3emhZht
Timeline:
0:00 Introduction
0:29 Where to install power outlet in the garden
1:00 How to get power out of the house
1:29 Know what your doing with electricity!
1:45 Digging the trench for electrical conduit
2:16 Installing underground conduit
2:42 Preparing entrance to the house
2:54 Pulling wire through pvc conduit
3:29 Backfilling the conduit trench
3:45 Installing GFCI outlet in the garden
4:18 Installing outlet and cover at the house entrance
4:59 Next steps for electrical
5:28 Closing thoughts
SUBSCRIBE FOR MORE VIDEOS: http://bit.ly/2qCFZkT
-----Social-----
http://instagram.com/busydadsworkshop
http://facebook.com/busydadsworkshop
http://pinterest.com/busydadsworkshop